Those of us who trained in the 2000s and 2010s will be familiar with the dreaded Sunday evening TES search and the frantic editing of mediocre PowerPoint slideshows for something – anything – to do with Year 8 on Monday morning.
It wasn’t until a few years into my teaching career that I began to wonder what people did before PowerPoint existed. It took me much longer than I would like to admit to realise that all those hours spent searching for PowerPoint slides were wasted. It eventually dawned on me that rather than outsourcing the lesson to PowerPoint, I should have been spending the time considering how I would explain the content.
In my opinion, a visualiser is the most versatile tool for explaining and modelling content. One of the great advantages is the control the teacher has over the release of new information. In the explanation phase, I aim to build ideas slowly from a blank canvas to keep their attention focused on what I want.

Using a visualiser: An example
Here is part of a typical Year 10 chemistry lesson on covalent bonding:
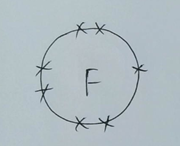
Whiteboards ready, I’m going to give you 30 seconds to draw the electron structure of fluorine…3-2-1-show me!
I can see about half of you have put too many electrons in the outer shell.
[puts a student whiteboard under visualiser]
I’ll now give you 30 seconds to turn and talk. How can we find out the number of electrons in the outer shell of fluorine?
[Cold call] – that’s right. Fluorine has 9 electrons in total, but 2 are in the first shell, and 7 are in the outer shell. We can self-check our drawings by looking at the group number.
[puts periodic table under visualiser]
Fluorine is in group 7 so it should have 7 electrons in the outer shell. Correct your diagrams now.
Fluorine isn’t happy with 7 electrons because its outer shell is not full. It would be happier and more stable if it could gain another electron from somewhere.

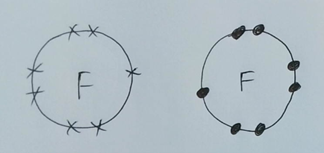
Notice I’ve only drawn the outer electrons because that’s where the magic/chemistry happens.
I’m going to draw another fluorine atom over here. See how I am using dots instead of crosses for my electrons? We’ll see why in a bit, but in reality, all electrons are exactly the same…

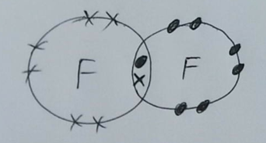
Now we have 2 unstable fluorine atoms. Each needs an extra electron to be stable. What happens is that they each share an electron like this…

Because this electron pair is in both outer shells we say it is shared. This is a covalent bond – a shared pair of electrons.
[Highlights bonding pair of electrons]
Now let’s count the number of electrons in the outer shell of each fluorine atom. Each one has 8 electrons, so each atom is stable.
If you made it through that, well done. You are on your way to becoming a master chemist! The content is not important here, I was attempting to illustrate how slowly building up an explanation can make for an effective learning episode.
I could have delivered this content with a PowerPoint slide or any number of other ways. But drawing it live enables me to drip feed information at an appropriate rate for the learners in the class whilst being able to emphasise the key content more easily than if I had projected a fully annotated diagram or list of bullet points.

The benefits of visualisers
More reasons to embrace the visualiser*:
- When positioned correctly, you can face the students whilst teaching.
- You can show students’ work to the class for live marking and feedback. See how Simon Baddeley and Ben Newmark use visualisers in their classroom!
- You can easily take photos of student work for later.
- During a ‘we do’, give students 2 minutes to get started, and then they can look at the board if they get stuck. Repeat as necessary and remove support at a pace suited to the learners in the room.
- Practical demonstrations can be done with the students in their seats.
- You no longer need to do a Stretch Armstrong impression for all students to see the board.
- I find that with a PowerPoint presentation, I am much less likely to deviate from the ‘script’, not because I haven’t spotted any misconceptions but because the slides are in a predetermined order, and I’m on autopilot.
*I am aware of the irony of this list of bullet points.
If you haven’t already, embed the visualiser in your teaching. You won’t look back.


Comments