
 9 Minute Read
Contents:
Teaching organic reaction mechanisms is one of the most satisfying parts of A Level Chemistry. The topics flow so well from one to the next. They are fantastic for retrieval practice and for making links between multiple topics synoptically. Unfortunately, this also makes them harder for students.
Changes in organic reaction mechanism assessment style
In recent years, the style of assessing mechanisms by AQA has changed quite substantially. Let’s look at a typical AQA Unit 4 question from 2015:

In this example, the reaction between an alcohol and an acid chloride is a classic case of the nucleophilic addition-elimination mechanism. There is a slight twist, which is the use of a secondary alcohol, which may have caused some difficulties. Otherwise, this is a fairly standard scenario to encounter. Now, let’s compare this with a more recent question from the 2022 AQA Paper 2:
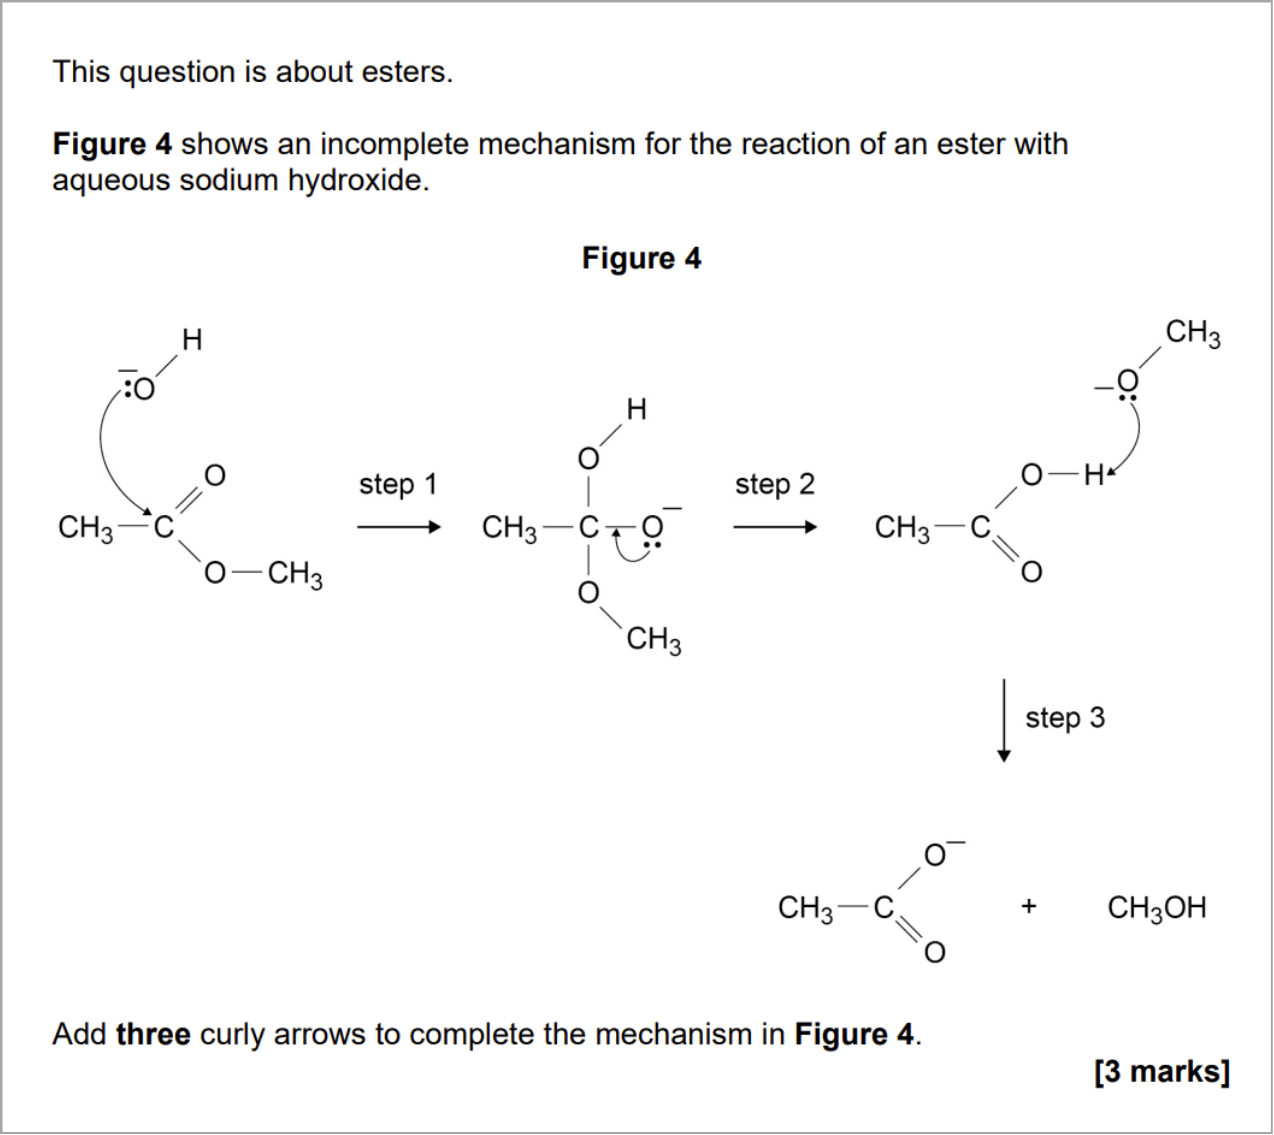
At first glance, this second example could appear more straightforward due to the scaffold given. However, students are not taught the curly arrow mechanism for the base hydrolysis of esters as a routine example. I once used acid hydrolysis of amides as a challenging example, but it was an ‘answers on a postcard’ type optional activity rather than something that was taught.
This question requires an understanding of what drives bond-breaking and bond-forming in terms of curly arrows, which could have panicked many students. Although the base hydrolysis of esters is part of the AQA specification, it is viewed in terms of the product mixture (carboxylate salt, alcohol) and in the context of saponification, possibly requiring equations but not the mechanism.
Rethinking how we teach organic reaction mechanisms
There has undoubtedly been a shift in house style from this exam board that necessitates a re-evaluation of how mechanisms are traditionally taught. This was alluded to in a comment about being able to assess a wider range of mechanisms across a paper, since the questions are now worth less with the scaffolding.
While mechanisms have never been a walk-in-the-park slab of rote learning, they were definitely more straightforward. Once a student knew a mechanism, they could apply it to slightly more complex examples, such as larger mechanisms or molecules with branches or additional functional groups, often scoring well (4–6 marks). However, the level of application now required goes way beyond memorising the steps of a specific mechanism.
In this article, I’ll explore a specific approach to teaching organic reaction mechanisms that provides an opportunity to convey the significance of a mechanism to students. It gets them thinking about what a mechanism means and what predictions and suggestions they can make about something that’s unfamiliar to them.
The mechanism of choice is nucleophilic addition-elimination, which is typically encountered towards the end of the topic on the carbonyl group. The prerequisite knowledge is as follows:
- Electronegativity and bond polarity (Year 12)
- Definition of a nucleophile (Year 12)
- The nucleophilic addition mechanism from earlier in the carbonyl topic (Year 13)
- Structure and naming of carboxylic acids and esters (Year 13)
Suggested lesson sequence
A lesson sequence could be as follows:
- Learn about the acyl group, leaving groups, and acylating agents. Cover the equations for the four reactions of acid chlorides and the four reactions of acid anhydrides.
- Explore the mechanisms of ethanoyl chloride reacting with water and ethanoyl chloride reacting with ethanol.
- Explore the mechanisms of ethanoyl chloride reacting with ammonia and ethanoyl chloride reacting with ethylamine.
- Provide practice activities to reinforce the learning.
For reasons of time, many teachers might combine steps 2 and 3 into one lesson. However, I genuinely think it requires roughly two hours of learning. Your ‘do now’ or starter activity in lesson one should also serve as a prerequisite knowledge check. Be ready to address any gaps this review reveals, especially from Year 12 content.
A crucial first point: I avoid front-loading the lesson with a generic version of the mechanism for students to look at or copy. In my view, this approach misses a valuable opportunity for students to apply their existing knowledge to an unfamiliar example. For this reason, I hold back on issuing any booklets or notes until after the explanation. I also avoid using generic representations like :Nu or Nu-H when teaching mechanisms. It’s just another thing for students to process which doesn’t help.
Building the mechanism step-by-step
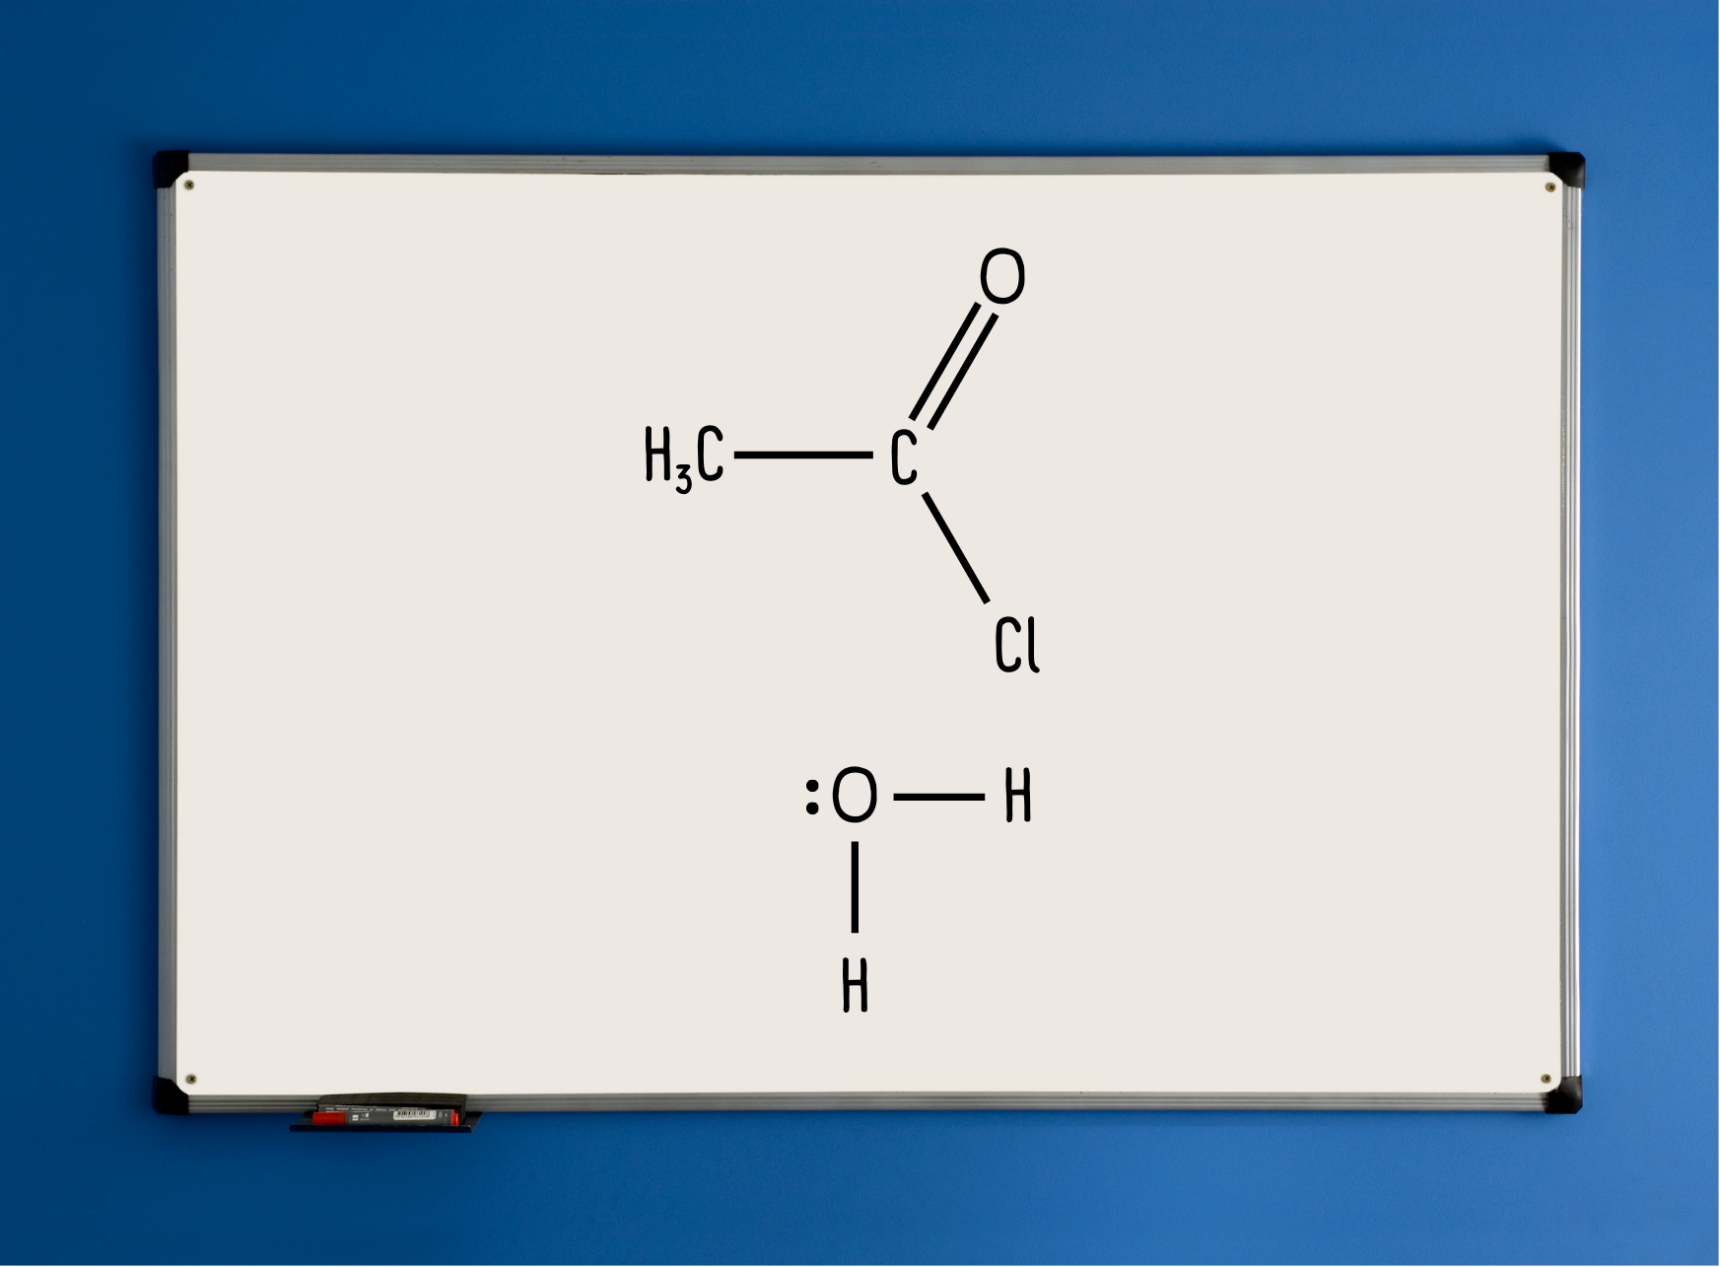
Students work on mini whiteboards for this activity. We begin with ethanoyl chloride. You can use “R” in place of the methyl group if you prefer, though I personally like to use a specific molecule to start. Students copy this onto their whiteboard.
What follows is then a series of cold call and show-me activities that build the mechanism collectively.
Cold call:
“Tell me about the nature of the carbonyl group, [student name].”
It’s polar.
“What’s the relative electronegativity of carbon and oxygen?”
Carbon is less electronegative than oxygen.
Whiteboard show-me:
“On your whiteboard, mark the partial charges. 3, 2, 1, show me!”
This usually has a 100% success rate, which might seem pointless, but it builds confidence and participation.
Cold call:
“Why is the partial positive charge on carbon relevant here?”
It makes the carbon susceptible to attack by nucleophiles.
“What is the nucleophile in this reaction?”
Water.
Whiteboard show-me:
“Using your whiteboard, suggest a sensible first curly arrow to show an electron pair movement.”
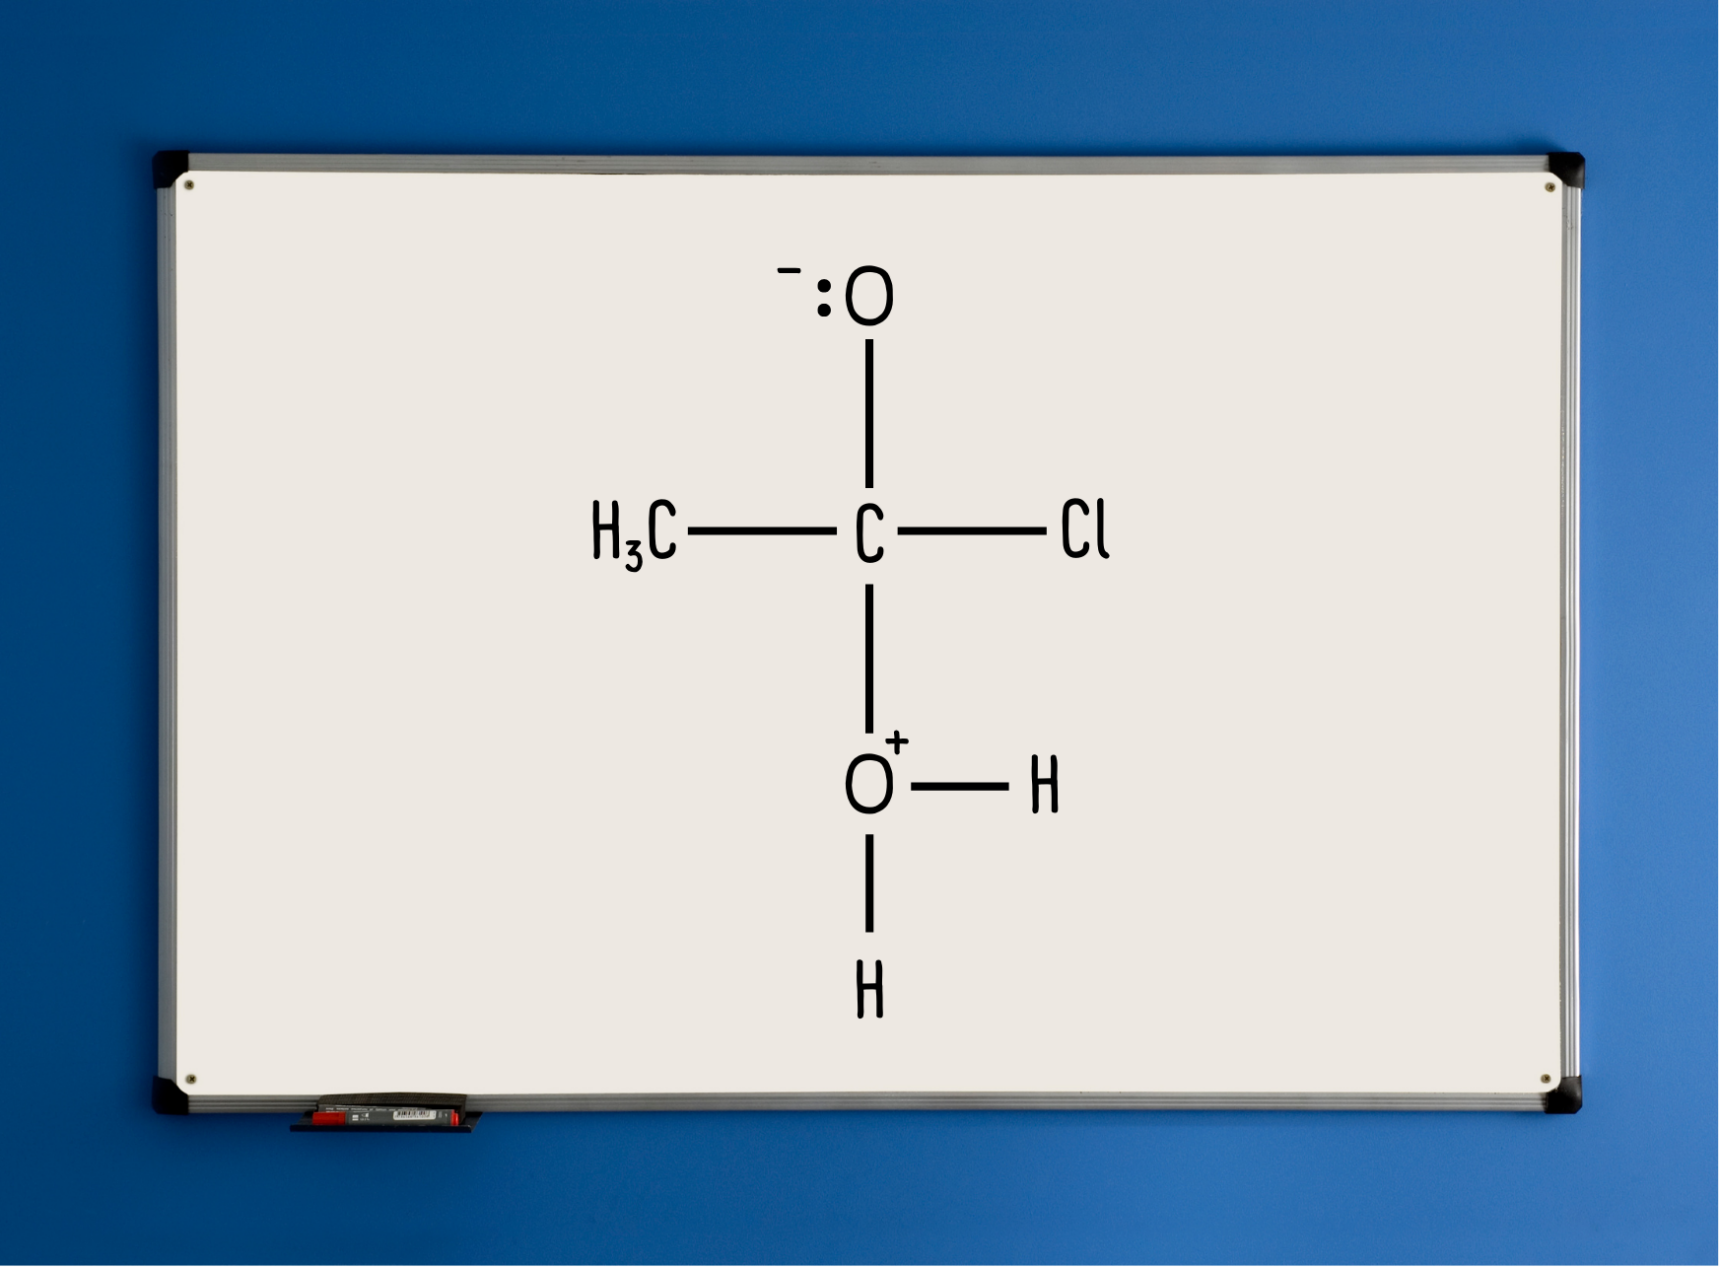
Curly arrow from the lone pair on the O in water to the partially positive C.
Cold call:
“Remember, the curly arrow shows the movement of an electron pair. If the lone pair is being donated, it actually shows the formation of a coordinate bond. Now that this has happened, what position does carbon find itself in, and why is this a problem?”
Carbon now has five bonds, but it ‘should’ have four.
Whiteboard show-me:
“Use your whiteboard to suggest another movement of electron pairs that will break a bond in this structure.”
At this stage, some students might show elimination of Cl. This is understandable and might even show that they have thought about the products. There might also be some other generic errors, like starting the arrow from C and going to O. Slowly and explicitly correct these errors.
Pause to link the correct electron pair movement on your whiteboard to what the students already know about nucleophilic addition from earlier lessons on carbonyl compounds. Link this to the first part of the hyphenated name.
Draw the intermediate on your whiteboard, but ask students to hold off for now.
Then, the questioning dialogue resumes:
Cold call:
“Three things need to happen now. To figure them out, let’s reference the equations we wrote last lesson. Look through your notes. What are the products of this reaction?”
A carboxylic acid and HCl.
Whiteboard show-me:
“On your whiteboard, name the carboxylic acid that will be formed in this reaction.”
Ethanoic acid.
Cold call:
“So, if I now draw this (draw ethanoic acid and HCl elsewhere), it will help us figure out what is going on. Let’s start at the top. What needs to happen between this C and the ⁻:O? What kind of bond is present in ethanoic acid?”
A carbon-oxygen double bond.
Whiteboard show-me:
“Copy the intermediate structure to your whiteboards. On your whiteboard, suggest how we might repair the double bond.”
Curly arrow from the lone pair back to the C-O bond.
Cold call:
“Moving downwards, is Cl part of the organic product?”
No.
“So, what’s the role of the Cl?”
Leaving group.
“How is it going to leave? If we consider HCl as made up of ions, what would they be?”
H⁺ and Cl⁻.
Whiteboard show-me:
“Okay, so Cl needs to leave as a negative ion. How might that happen in terms of curly arrows to indicate electron pair movement?”
Bonding pair from the C-Cl bond moves onto Cl.
“Excellent! We’re almost there. Now, H needs to leave as a positive ion. How might that happen in terms of curly arrows?”
Bonding pair from the H-O bond moves onto O⁺. This movement is often harder for students to grasp.
This approach takes more time than when working from a generic mechanism or a provided example, but it gives everyone a chance to make suggestions and contribute. It encourages all students to think hard and, crucially, to understand the mechanisms rather than simply memorise them. I explain to the students why I’m teaching them this way with reference to the more recent Paper 2 questions, rather than simply showing one version of the mechanism and then saying “OK, propanoyl chloride and water, go!”.
After this interactive process, I’ll hand out the booklet and have them go through the entire mechanism in silence on a blank whiteboard. This might seem like a waste of time, but it’s purely for muscle memory and a bit of ‘sinking in’. I don’t tend to bother doing a larger acid chloride for the practice task until later in the lesson or the sequence. I’ll have the students attempt an equation on whiteboards using the information from the mechanism and the generic equation they copied in the first lesson. In my experience, students find writing equations for organic reactions using structural formulae much harder than we might anticipate, even when they can do the corresponding mechanisms.
I then move onto ethanoyl chloride and ethanol. This step requires less direct input from me as the teacher, but depending on their confidence level and how they orient bonds in the intermediate, students might well try to break the C-O bond instead of an O-H bond in the second step. As we review, I’ll ask for input on the five arrows, followed by naming the ester on mini whiteboards. At this stage, you might have to revisit the process of naming esters. If you prefer, you can save this review for the practice lesson.
I usually conclude with a few practice examples involving different acid chlorides, water, and alcohols, ending with a final whiteboard task completed in silence and without notes.
You can introduce this teaching style in Year 12, though not right away.
Moving forward, I’d like to build a library of unfamiliar example scaffolds – drawing from Paper 2 and beyond – to reinforce this concept for all students, not just as a challenge material.
 Copy URL


Comments